
前言
很开心这篇美化文章能够帮助到大家,如果转载请标注原文地址哦,十分感谢!
事先声明,我也是小白,为了美化博客可谓是搜遍了网络,搬运了以下一些美化/特效代码,具体参数大家也可根据自己需要调整。另,希望大家勿失创建博客网站的本心,多学习多更新,一起进步呀!
1. 页脚代码(备案信息、运行时间等)
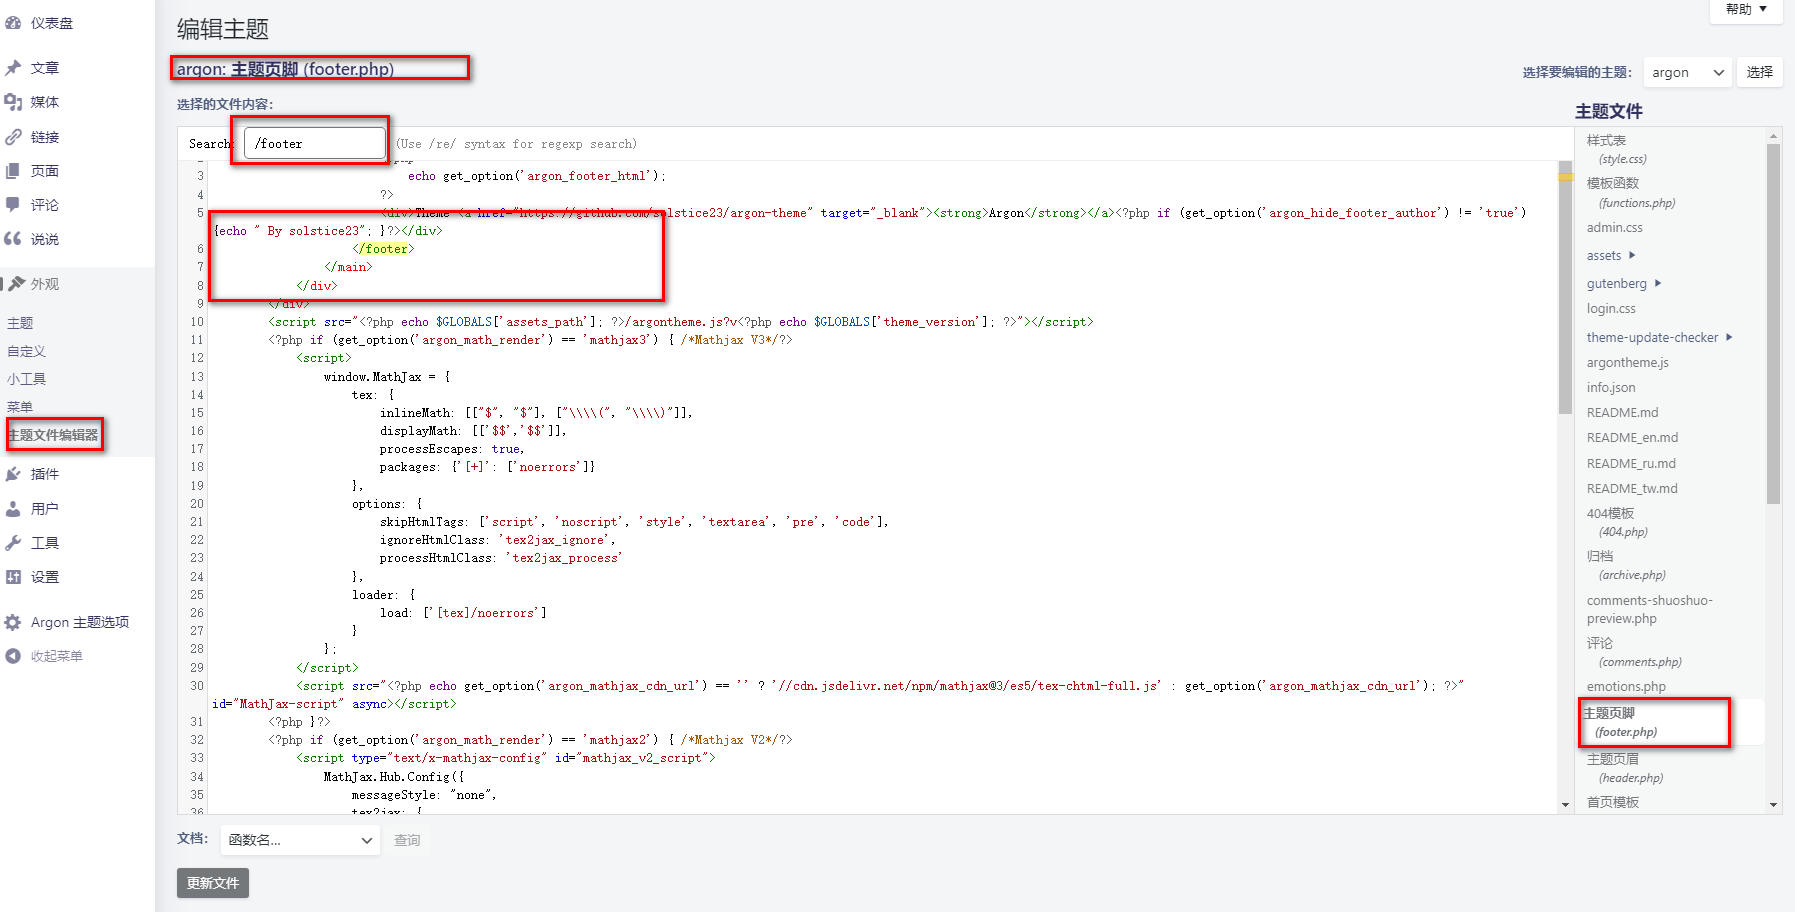
在外观–>主题文件编辑器–>主题页脚(footer.php文件)–>在</footer>之前(或Argon主题选项–页脚内容),添加以下代码
1.1CSS代码:
<style>
/* 核心样式css */
.github-badge {
	display: inline-block;
	border-radius: 4px;
	text-shadow: none;
	font-size: 13.1px;
	color: #fff;
	line-height: 15px;
	margin-bottom: 5px;
	font-family: "Open Sans", sans-serif;
}

.github-badge .badge-subject {
	display: inline-block;
	background-color: #4d4d4d;
	padding: 4px 4px 4px 6px;
	border-top-left-radius: 4px;
	border-bottom-left-radius: 4px;
	font-family: "Open Sans", sans-serif;
}

.github-badge .badge-value {
	display: inline-block;
	padding: 4px 6px 4px 4px;
	border-top-right-radius: 4px;
	border-bottom-right-radius: 4px;
	font-family: "Open Sans", sans-serif;
}

.github-badge-big {
	display: inline-block;
	border-radius: 6px;
	text-shadow: none;
	font-size: 14.1px;
	color: #fff;
	line-height: 18px;
	margin-bottom: 7px;
}

.github-badge-big .badge-subject {
	display: inline-block;
	background-color: #4d4d4d;
	padding: 4px 4px 4px 6px;
	border-top-left-radius: 4px;
	border-bottom-left-radius: 4px;
}

.github-badge-big .badge-value {
	display: inline-block;
	padding: 4px 6px 4px 4px;
	border-top-right-radius: 4px;
	border-bottom-right-radius: 4px;
}

/* 颜色定义css */
.bg-orange {
	background-color: #ec8a64 !important;
}
.bg-red {
	background-color: #cb7574 !important;
}
.bg-apricots {
	background-color: #f7c280 !important;
}
.bg-casein {
	background-color: #dfe291 !important;
}
.bg-shallots {
	background-color: #97c3c6 !important;
}
.bg-ogling {
	background-color: #95c7e0 !important;
}
.bg-haze {
	background-color: #9aaec7 !important;
}
.bg-mountain-terrier {
	background-color: #99a5cd !important;
}
</style>
1.2HTML代码:
1.2.1添加备案信息
<!-- 页脚添加备案信息 -->
<div class="github-badge-big">
    <span class="badge-subject"><i class="fa fa-id-card"></i> 备案号 </span>
    <span class="badge-value bg-orange"><a href="https://beian.miit.gov.cn/" target="_blank" one-link-mark="yes">豫ICP备0000000000号</a>|
        <a href="http://www.beian.gov.cn/portal/registerSystemInfo?recordcode= 32072202010255" target="_blank" one-link-mark="yes">豫公网安备 00000000000000号</a>
    </span>
</div>

<!-- 页脚添加链接 -->
<div class="github-badge-big">
    <span class="badge-subject"><i class="fa fa-cloud" aria-hidden="true"></i> CDN</span>
    <span class="badge-value bg-shallots">
        <a href="" target="_blank" one-link-mark="yes"></a>
        <a href="https://www.upyun.com/" target="_blank" one-link-mark="yes">Upyun</a>
    </span>

    <span class="badge-subject"><i class="fa fa-wordpress"></i> Powered</span>
    <span class="badge-value bg-green"><a href="https://cn.wordpress.org/" target="_blank" one-link-mark="yes">WordPress</a>
    </span>

    <span class="badge-subject"><i class="fa fa-copyright" aria-hidden="true"></i> Copyright</span>
    <span class="badge-value bg-red">
        <a href="https://idaling.cn/" target="_blank" one-link-mark="yes">@ 2023 Daling</a>
    </span>
</div>
1.2.2添加博客运行时间
两段代码任选其一即可,我选用的是第一种,添加了背景色
<!-- 页脚添加博客运行时间:代码1 -->
<div class="github-badge-big">
    <span class="badge-subject"><i class="fa fa-clock-o"></i> Running Time</span>
    <span class="badge-value bg-apricots">
        <span id="blog_running_days" class="odometer odometer-auto-theme"></span> days
        <span id="blog_running_hours" class="odometer odometer-auto-theme"></span> H
        <span id="blog_running_mins" class="odometer odometer-auto-theme"></span> M
        <span id="blog_running_secs" class="odometer odometer-auto-theme"></span> S
    </span>

 <script no-pjax="">
	var blog_running_days = document.getElementById("blog_running_days");
	var blog_running_hours = document.getElementById("blog_running_hours");
	var blog_running_mins = document.getElementById("blog_running_mins");
	var blog_running_secs = document.getElementById("blog_running_secs");

	function refresh_blog_running_time(){
		var time = new Date() - new Date(2023, 10,21, 0, 0, 0);
    	//此处月份要-1,因为JS中Date月份从0开始算    //2023.11.21开始运行
		var d = parseInt(time / 24 / 60 / 60 / 1000);
		var h = parseInt((time % (24 * 60 * 60 * 1000)) / 60 / 60 / 1000);
		var m = parseInt((time % (60 * 60 * 1000)) / 60 / 1000);
		var s = parseInt((time % (60 * 1000)) / 1000);
		blog_running_days.innerHTML = d;
		blog_running_hours.innerHTML = h;
		blog_running_mins.innerHTML = m;
		blog_running_secs.innerHTML = s;
	}

	refresh_blog_running_time();
		if (typeof bottomTimeIntervalHasSet == "undefined") {
			var bottomTimeIntervalHasSet = true;
			setInterval(function () {refresh_blog_running_time();}, 500);
		}
</script>
</div>


<!-- 页脚添加博客运行时间:代码2 -->
<div>本博客已运行
    <span id="blog_running_days" class="odometer"></span> days
    <span id="blog_running_hours" class="odometer"></span> h
    <span id="blog_running_mins" class="odometer"></span> m
    <span id="blog_running_secs" class="odometer"></span> s
</div>

<script no-pjax>
	var blog_running_days=document.getElementById("blog_running_days");
	var blog_running_hours=document.getElementById("blog_running_hours");
	var blog_running_mins=document.getElementById("blog_running_mins");
	var blog_running_secs=document.getElementById("blog_running_secs");

	function refresh_blog_running_time(){
    	var time = new Date() - new Date(2023,0,11, 8, 0, 0);
		//此处月份要-1,因为JS中Date月份从0开始算    //2023.1.11开始运行
    	var d=parseInt(time/24/60/60/1000);
    	var h=parseInt(time%(24*60*60*1000)/60/60/1000);
		var m=parseInt(time%(60*60*1000)/60/1000);
        var s=parseInt(time%(60*1000)/1000);
    	blog_running_days.innerHTML=d;
    	blog_running_hours.innerHTML=h;
    	blog_running_mins.innerHTML=m;
    	blog_running_secs.innerHTML=s;
	}

	refresh_blog_running_time();
	if (typeof(bottomTimeIntervalHasSet) == "undefined"){
    	var bottomTimeIntervalHasSet = true;
    	setInterval(function(){refresh_blog_running_time();},500);
	}
</script>
1.2.3运行时间及占用内存
在外观–>主题文件编辑器–>主题页脚(footer.php文件)–>在</footer>之前(或Argon主题选项–页脚内容),添加以下代码
在var birthDay =NewDate("2023-11-21");这里,你修改成你自己的时间即可。应该没有强迫症纠结为什么不可以设置时分秒的吧!
<!--运行时间及占用内存开始-->
<span id="momk"></span>
<span id="momk" style="color: #ff0000;"></span>

<script type="text/javascript">
	function NewDate(str) {
		str = str.split('-');
		var date = new Date();
		date.setUTCFullYear(str[0], str[1] - 1, str[2]);
		date.setUTCHours(0, 0, 0, 0);
		return date;
	}
	function momxc() {
	<!--这里要改成自己博客的诞生时间-->
		var birthDay =NewDate("2023-11-21");
		var today=new Date();
		var timeold=today.getTime()-birthDay.getTime();
		var sectimeold=timeold/1000
		var secondsold=Math.floor(sectimeold);
		var msPerDay=24*60*60*1000; var e_daysold=timeold/msPerDay;
		var daysold=Math.floor(e_daysold);
		var e_hrsold=(daysold-e_daysold)*-24;
		var hrsold=Math.floor(e_hrsold);
		var e_minsold=(hrsold-e_hrsold)*-60;
		var minsold=Math.floor((hrsold-e_hrsold)*-60); var 									seconds=Math.floor((minsold-e_minsold)*-60).toString();
		document.getElementById("momk").innerHTML = "本站已安全运行:"+daysold+"天"+hrsold+"小时"+minsold+"分"+seconds+"秒<br>";
		setTimeout(momxc, 1000);
	}momxc();
</script>

<style>
#momk{animation:change 10s infinite;font-weight:800; }
@keyframes change{0%{color:#5cb85c;}25%{color:#556bd8;}50%{color:#e40707;}75%{color:#66e616;}100% {color:#67bd31;}}
</style>

<?php printf(' | 耗时 %.3f 秒 | 查询 %d 次 | 内存 %.2f MB |',timer_stop( 0, 3 ),get_num_queries(),memory_get_peak_usage() / 1024 / 1024);?><br>
<!--运行时间及占用内存结束-->
2.网站美化代码
2.1网站背景虚化/透明
2.1.1背景主题色半透明
在不改变主题色的前提下,将卡片等事物的背景透明化(可以自己更改透明度)
1、第一步,在外观–自定义–额外css中添加:
#leftbar_announcement {
	background: var(--themecolor-gradient) !important;
}
#footer{
	background: var(--themecolor-gradient) !important
}
2、第二步,在 Argon主题选项–脚本–页尾脚本 添加下面的脚本:
// 背景主题色半透明开始
<script>
function hexToRgb(hex,op){
	let str = hex.slice(1);
	let arr;
	if (str.length === 3) arr = str.split('').map(d => parseInt(d.repeat(2), 16));
	else arr = [parseInt(str.slice(0, 2), 16), parseInt(str.slice(2, 4), 16), parseInt(str.slice(4, 6), 16)];
	return `rgb(${arr.join(', ')}, ${op})`;
};

	let themeColorHex = getComputedStyle(document.documentElement).getPropertyValue('--themecolor').trim();
	let op1 = 0.6
	let themeColorRgb = hexToRgb(themeColorHex,op1);
	let themecolorGradient = getComputedStyle(document.documentElement).getPropertyValue('--themecolor-gradient')
	document.documentElement.style.setProperty('--themecolor-gradient',themeColorRgb)

	let op2 = 0.8
	let colorTint92 = getComputedStyle(document.documentElement).getPropertyValue('--color-tint-92').trim();
	colorTint92 += ', '+op2;
	document.documentElement.style.setProperty('--color-tint-92',colorTint92)

	let op3 = 0.65
	let colorShade90 = getComputedStyle(document.documentElement).getPropertyValue('--color-shade-90').trim();
	colorShade90 += ', ' + op3;
	document.documentElement.style.setProperty('--color-shade-90',colorShade90)

	let op4 = 0.8
	let colorShade86 = getComputedStyle(document.documentElement).getPropertyValue('--color-shade-86').trim();
	colorShade86 += ', ' + op4;
	document.documentElement.style.setProperty('--color-shade-86',colorShade86)
</script>
// 背景主题色半透明结束
如何修改透明度(透明度变量说明):
op1——“白天”状态主题色透明度
op2——“白天”状态卡片颜色透明度
op3——“夜间”状态卡片颜色透明度
op4——“夜间”状态主题色透明度
2.1.2背景透明
在外观–自定义–额外css 中添加:
/*========透明设置css===========*/

/* 白天卡片背景透明 */
.card{
	background-color:rgba(255, 255, 255, 0.8) !important;
	/*backdrop-filter:blur(6px);*//*毛玻璃效果主要属性*/
	-webkit-backdrop-filter:blur(6px);
}

/* 夜间透明 */
html.darkmode.bg-white,html.darkmode .card,html.darkmode #footer{
	background:rgba(66, 66, 66, 0.9) !important;
}
html.darkmode #fabtn_blog_settings_popup{
	background:rgba(66, 66, 66, 0.95) !important;
}

/* 小工具栏背景完全透明 */
/*小工具栏是card的子元素,如果用同一个透明度会叠加变色,故改为完全透明*/
.card .widget,.darkmode .card .widget,#post_content > div > div > div.argon-timeline-card.card.bg-gradient-secondary.archive-timeline-title{
	background-color:#ffffff00 !important;
	backdrop-filter:none;
	-webkit-backdrop-filter:none;
}
.emotion-keyboard,#fabtn_blog_settings_popup{
	background-color:rgba(255, 255, 255, 0.95) !important;
}

/* 分类卡片透明 */
.bg-gradient-secondary{
	background:rgba(255, 255, 255, 0.1) !important;
	backdrop-filter: blur(10px);
	-webkit-backdrop-filter:blur(10px);
}

/*底栏透明*/
#footer {
	background:rgba(33, 150, 243, 0.8) !important;
}
.title {
	position: relative;
	padding-left: 22px;
	margin: 24px 0;
}
.title:before {
	content: "";
	background-color: #3796EC;
	width: 8px;
	height: 25px;
	position: absolute;
	left: 0;
	top: 42%;
	margin-top: -8px;
	-webkit-border-radius: 3px;
	-moz-border-radius: 3px;
	border-radius: 10px;
}
.title1 {
	position: relative;
	padding-left: 12px;
	margin: 24px 0;
}
.title1:before {
	content: "";
	background-color: #3796EC;
	width: 4px;
	height: 15px;
	position: absolute;
	left: 0;
	top: 50%;
	margin-top: -8px;
	-webkit-border-radius: 3px;
	-moz-border-radius: 3px;
	border-radius: 10px;
}
.title2 {
	position: relative;
	padding-left: 20px;
	margin: 24px 0;
}
.title2:before {
	content: "";
	background-color: #3796EC;
	width: 8px;
	height: 28px;
	position: absolute;
	left: 0;
	top: 42%;
	margin-top: -8px;
	-webkit-border-radius: 3px;
	-moz-border-radius: 3px;
	border-radius: 10px;
}

/* 标签背景 */
/*.post-meta-detail-tag {
    background:rgba(255, 255, 255, 0.5)!important;
}*/
2.1.3背景虚化
在外观–>主题文件编辑器–>主题页脚(footer.php文件)–>在末尾</body>上方( 或Argon主题选项–脚本–页脚脚本)
<!--滚动模糊特效开始-->
<script>
window.addEventListener("scroll", function (e) {
  if (window.scrollY > window.innerHeight * 0.3) {
    document.querySelector("#content").classList.add("scrolled");
  } else {
    document.querySelector("#content").classList.remove("scrolled");
  }
});
</script>

<style>
#content.scrolled::before, #content.scrolled::after {
  filter: blur(6px); /*数字越大虚化越明显*/
  transform: scale(1.02); /*数字越大背景放大越明显*/
}
#content::before, #content::after {
  transition: filter .3s ease, transform .3s ease !important;
  filter: blur(0px);
  transform: scale(1.02);
}
</style>
<!--滚动模糊特效结束-->
大致原理是通过一个JS函数定义了背景虚化的应用时机与scroll行为绑定,从而达到目标效果。
2.2网站字体
2.2.1网站字体样式
1、字体来源:可以到 100font.com、字体天下 进行下载
2、转换字体文件:前往 TTF to WOFF2 将字体文件转换问woff2格式
3、存放文件:转换后的字体文件,可以可以选则存放到你自己的网站文件根目录下面,或者某个CDN中
4、修改css:最后只需要在网站的外观–自定义–额外css中添加字体样式即可,如下所示。
/* 网站字体css */
/*原则上你可以设置多个字体,然后在不同的部位使用不同的字体。*/
/* 设置网站字体:代码1 */
@font-face{
	font-family:btfFont;
	src: url(https://blog.hongshaoyv.com/font/jyhphy-2.woff2) format('woff2')
}
body{
	font-family:"btfFont" !important
}


/* 设置网站字体:代码2 */
@font-face{
	font-family:echo;
    src:url(https://fastly.jsdelivr.net/gh/huangwb8/bloghelper@latest/fonts/13.woff2) format('woff2')
	font-weight:400;
	unicode-range: U+1f1e9-1f1f5;
	font-display:swap;
}

body{
	font-family: 'echo', Georgia, -apple-system, 'Nimbus Roman No9 L', 'PingFang SC', 'Hiragino Sans GB', 'Noto Serif SC', 'Microsoft Yahei', 'WenQuanYi Micro Hei', 'ST Heiti', sans-serif
}


/* 设置网站字体:代码3 */
@font-face {
	font-family: myFont;
	src:url(https://img.crowya.com/font/FZFWZZAY.woff2) format('woff2');
	font-display: swap;
}

body,
.nav-link-inner--text {
	font-family: myFont;
}

.navbar-brand {
	font-size: 1.25rem;
	font-weight: 100;
	margin-right: 2rem;
	padding-bottom: .1rem;
}
解释: 上面的css代码中,在url中写的是自己存放字体文件的位置,可以将字体文件存放在服务器,并利用nginx定位到它。 在css中将此字体命名为“btFont”,并将它应用在“body”范围内。
2.2.2网站字体大小及颜色
在 外观–自定义–额外css 中添加:
/*========网页字体css===========*/

/* 横幅字体大小 */
.banner-title {
	font-size: 2.5em;
}
.banner-subtitle{
	font-size: 28px;
	-webkit-text-fill-color: transparent;
background: linear-gradient(94.75deg,rgb(60, 172, 247) 0%,rgb(131, 101, 253) 43.66%,rgb(255, 141, 112) 64.23%,rgb(247, 201, 102) 83.76%,rgb(172, 143, 100) 100%);
	-webkit-background-clip: text;
}

/* 文章标题字体大小 */
.post-title {
	font-size: 25px
}

/* 正文字体大小(不包含代码)*/
.post-content p{
	font-size: 1.25rem;
}
li{
	font-size: 1.2rem;
}

/* 评论区字体大小 */
p {
	font-size: 1.2rem
}

/* 评论发送区字体大小 */
.form-control{
	font-size: 1.2rem
}

/* 评论勾选项目字体大小 */
.custom-checkbox .custom-control-input~.custom-control-label{
	font-size: 1.2rem
}

/*评论区代码的强调色*/
code {
	color: rgba(var(--themecolor-rgbstr));
}

/* 说说字体大小和颜色设置 */
.shuoshuo-title {
	font-size: 25px;
/*	color: rgba(var(--themecolor-rgbstr)); */
}

/* 尾注字体大小 */
.additional-content-after-post{
	font-size: 1.2rem
}

/* 公告居中 */
.leftbar-announcement-title {
    font-size: 20px;
/*	text-align: center; */
	color: #00FFFF
}
.leftbar-announcement-content {
    font-size: 15px;
    line-height: 1.8;
    padding-top: 8px;
    opacity: 0.8;
/*	text-align: center; */
	color:#00FFFF;
}

/* 一言居中 */
.leftbar-banner-title {
	font-size: 20px;
	display: block;
	text-align: center;
	opacity: 0.8;
}

/* 个性签名居中 */
.leftbar-banner-subtitle {
	margin-top: 15px;
	margin-bottom: 8px;
	font-size: 13px;
	opacity: 0.8;
	display: block;
	text-align: center;
}


/*========颜色设置css===========*/

/* 设置加粗字体颜色 */
strong {
    /*白天*/
    color: #A7727D;
}
html.darkmode strong {
    /*夜晚*/
    color: #FAAB78;
}

/* 说说预览模式的代码字体颜色 */
pre {
    /*白天*/
    color: #A7727D;
}
html.darkmode pre {
    /*夜晚*/
    color: #FAAB78;
}

/* 文章或页面的正文颜色 */
body{
	color:#364863
}

/* 引文属性设置 */
blockquote {
	/*添加弱主题色为背景色*/
	background: rgba(var(--themecolor-rgbstr), 0.1) !important;
	width: 100%
}

/* 引文颜色,建议用主题色 */
:root {
	/*也可以用类似于--color-border-on-foreground-deeper: #009688;这样的命令*/
	--color-border-on-foreground-deeper: rgba(var(--themecolor-rgbstr));
}

/* 左侧菜单栏突出颜色修改 */
.leftbar-menu-item > a:hover, .leftbar-menu-item.current > a{
	background-color: #f9f9f980;
}

/* 站点概览分隔线颜色修改 */
.site-state-item{
	border-left: 1px solid #aaa;
}
.site-friend-links-title {
	border-top: 1px dotted #aaa;
}
#leftbar_tab_tools ul li {
	padding-top: 3px;
	padding-bottom: 3px;
	border-bottom:none;
}
html.darkmode #leftbar_tab_tools ul li {
	border-bottom:none;
}

/* 左侧栏搜索框的颜色 */
button#leftbar_search_container {
	background-color: transparent;
}
2.2.3网站标题字体彩色霓虹效果
在 外观–自定义–额外css 中添加:
/* 网站标题字体彩色霓虹效果css */
@keyframes ColdLight {
	0%{
		background-position: 0%;
	}
	100%{
		background-position: 200%;
	}
}

.banner-title{
	position: absolute;
	background: linear-gradient(90deg, #03a9f4, #f441a5, #ffeb3b, #03a9f4);
	background-size:200%;
	animation: ColdLight 3s linear infinite;
	color:transparent !important;
	-webkit-background-clip: text;
}

.banner-title::before {
	content: '';
	position: absolute;
	top: 0;
	left: 50%;
	bottom: 0;
	right: 0;
	transform:translatex(-50%);
	max-width:500px;
	z-index: -100;
	background:white;
	filter: blur(30px);
	opacity: 0.5;
}

.banner-title .banner-title-inner{
	position:relative;
	background:inherit;
}

.banner-title .banner-subtitle{
	position:relative;
	background:inherit;
}
2.2.4网站标题缩放特效
在 外观–自定义–额外css 中添加:
/* 标题缩放css */
.banner-title{
	transition: .8s cubic-bezier(.2,.8,.2,1);
}
.banner-title:hover {
	transform:scale(1.4) translateY(-50%);
}
2.3网站排版设置
在 外观–自定义–额外css 中添加:
2.3.1整体排版
/*========排版设置css===========*/

/* 左侧栏层级置于上层 */
#leftbar_part1 {
	z-index: 1;
}

/* 分类卡片文本居中 */
#content > div.page-information-card-container > div > div{
	text-align:center;
}

/* 子菜单对齐及样式调整 */
.dropdown-menu .dropdown-item>i{
	width: 10px;
}
.dropdown-menu>a {
	color:var(--themecolor);
}
.dropdown-menu{
	min-width:max-content;
}
.dropdown-menu .dropdown-item {
	padding: .5rem 1.5rem 0.5rem 1rem;
}
.leftbar-menu-subitem{
	min-width:max-content;
}
.leftbar-menu-subitem .leftbar-menu-item>a{
	padding: 0rem 1.5rem 0rem 1rem;
}

/* 左侧栏边距修改 */
.tab-content{
	padding:10px 0px 0px 0px !important;
}
.site-author-links{
	padding:0px 0px 0px 10px ;
}

/* 目录位置偏移修改 */
#leftbar_catalog{
	margin-left: 0px;
}

/* 目录条目边距修改 */
#leftbar_catalog .index-link{
	padding: 4px 4px 4px 4px;
}

/* 左侧栏小工具栏字体缩小 */
#leftbar_tab_tools{
	font-size: 14px;
}

/* 正文图片边距修改 */
article figure {margin:0;}

/* 正文图片居中显示 */
.fancybox-wrapper {
	margin: auto;
}

/* 正文表格样式修改 */
article table > tbody > tr > td,
article table > tbody > tr > th,
article table > tfoot > tr > td,
article table > tfoot > tr > th,
article table > thead > tr > td,
article table > thead > tr > th{
    padding: 8px 10px;
    border: 1px solid;
}

/* 表格居中样式 */
.wp-block-table.aligncenter{margin:10px auto;}

/* 回顶图标放大 */
button#fabtn_back_to_top, button#fabtn_go_to_comment, button#fabtn_toggle_blog_settings_popup, button#fabtn_toggle_sides, button#fabtn_open_sidebar{
    font-size: 1.2rem;
}

/* 顶栏菜单放大:代码1*/
/*这里也可以设置刚刚我们设置的btfFont字体。试试看!*/
.navbar-nav .nav-link {
	font-size: 1rem;
	font-family: 'echo';
}
.navbar-brand {
	font-family: 'echo';
	font-size: 1.2rem;
	margin-right: 1.0 rem;
	padding-bottom: 0.2 rem;

	-webkit-text-fill-color: transparent;
	background: linear-gradient(94.75deg,rgb(60, 172, 247) 0%,rgb(131, 101, 253) 43.66%,rgb(255, 141, 112) 64.23%,rgb(247, 201, 102) 83.76%,rgb(172, 143, 100) 100%);
	-webkit-background-clip: text;
}
/* 顶栏菜单放大:代码2*/
.navbar-nav .nav-link {
	font-size: 1rem;
}
.navbar-brand {
	//font-family: 'Noto Serif SC',serif;
	font-size: 1.1rem;
	margin-right: 1rem;
	padding-bottom: .2rem;
}
.navbar-nav .nav-item {
	margin-right:0;
}
.mr-lg-5, .mx-lg-5 {
	margin-right:1rem !important;
}
.navbar-toggler-icon {
	width: 1.5rem;
	height: 1.5rem;
}
.navbar-expand-lg .navbar-nav .nav-link {
	padding-right: 0.9rem;
	padding-left: 1rem;
}

/* 菜单大小 */
.nav-link-inner--text {
	font-size: 1.25em;
}
.navbar-nav .nav-item {
	margin-right:0;
}
.mr-lg-5, .mx-lg-5 {
	margin-right:1rem !important;
}
.navbar-toggler-icon {
	width: 1.8rem;
	height: 1.8rem;
}

/* 菜单项间距调整 */
/* 如果你的菜单项不太多(5、6个左右),那么基本不需要额外设置此样式 */
.navbar-expand-lg .navbar-nav .nav-link {
    padding-right: 0.5rem;
    padding-left: 0.5rem;
}

/* 隐藏wp-SEO插件带来的线条阴影(不一定要装)*/
*[style='position: relative; z-index: 99998;'] {
    display: none;
}


/*========Github卡片样式css===========*/

/* Github卡片样式*/
.github-info-card-header a {
    /*Github卡片抬头颜色*/
    color: black !important;
    font-size: 1.5rem;
}
html.darkmode .github-info-card-header a {
    /*Github卡片抬头颜色——夜间*/
    color: #FAAB78 !important;
    font-size: 1.5rem;
}
.github-info-card {
    /*Github卡片文字(非链接)*/
    font-size: 1rem;
    color: black !important;
}
html.darkmode .github-info-card {
    /*Github卡片文字(非链接)——夜间*/
    font-size: 1rem;
    color: #FAAB78 !important;
}
.github-info-card.github-info-card-full.card.shadow-sm {
    /*Github卡片背景色*/
    background-color: rgba(var(--themecolor-rgbstr), 0.1) !important;
}
2.3.2左上角图片大小、文字间距
/* 左上角图片大小 */
.navbar-brand img {
	height: 60px;
}

/* 左上角图片和右侧文字的间距 */
.mr-lg-5, .mx-lg-5 {
	margin-right: 1rem !important;
}
2.2.3左侧栏设置
/*========左侧栏外观CSS===========*/

/* 头像缩放 */
#leftbar_overview_author_image {
	width: 100px;
	height: 100px;
	margin: auto;
	background-position: center;
	background-repeat: no-repeat;
	background-size: cover;
	background-color: rgba(127, 127, 127, 0.1);
	overflow: hidden;
	transition: transform 0.3s ease;/*变化速度*/
}

/* 头像亮暗 */
#leftbar_overview_author_image:hover {
	transform: scale(1.23);/*缩放大小*/
	filter: brightness(150%);/*调节亮度*/
}

/* 名称 */
#leftbar_overview_author_name {
	margin-top: 15px;
	font-size: 18px;align-content;
	color:#00FFFF;
}

/* 简介 */
#leftbar_overview_author_description {
	font-size: 14px;
	margin-top: -4px;
	opacity: 0.8;
	color:#c21f30;
}

/* 标题,链接等 */
a, .btn-neutral {
	color:#AF7AC5 ;
}

/* 页脚透明 */
#footer {
	background: var(--themecolor-gradient);
	color: #fff;
	width: 100%;
	float: right;
	margin-bottom: 25px;
	text-align: center;
	padding: 25px 20px;
	line-height: 1.8;
	transition: none;
	opacity: 0.6;
}
2.4Banner下方小箭头滚动效果
这是目前唯一一个改动了主题源文件的样式美化
1、打开 外观–主题文件编辑器–主题页眉(header.php文件)
2、在第 439 行找到:
<div class="cover-scroll-down">
将这个div代码块中的内容(也就是原本的标签)用下面的代码替换:
<i class="fa fa-angle-down" aria-hidden="true" id="pointer1"></i>
<i class="fa fa-angle-down" aria-hidden="true" id="pointer2"></i>
<i class="fa fa-angle-down" aria-hidden="true" id="pointer3"></i>

<!--原代码-->
<i class="fa fa-angle-down" aria-hidden="true"></i>
3、在 外观–自定义–额外css 添加如下代码:
/* Banner下方小箭头滚动效果 */
@keyframes up-down-move {
	0% {
		opacity:0;
		transform:translate(-50%,-150px);
	}
	50% {
		opacity:1;
		transform:translate(-50%,-130px);
	}
	100% {
		opacity:0;
		transform:translate(-50%,-110px);
	}
}

.cover-scroll-down .fa-angle-down{
	font-size: 3rem;
	text-shadow: 0px 0px 8px #dc1111;
	position:absolute;
	transform: translate(-50%,-80px);
	opacity:0;
}

.cover-scroll-down #pointer1{
	animation: up-down-move 3s linear infinite;
}

.cover-scroll-down #pointer2{
	animation: up-down-move 3s 1s linear infinite;
}

.cover-scroll-down #pointer3{
	animation: up-down-move 3s 2s linear infinite;
}
2.5菜单前添加图标
这里面的图标其实本质上是文字而不是图片
2.5.1方法一
Argon 主题内置了 Font Awesome 4.7.0 图标库。所以只需要在前面添加代码即可。
图标库链接:Font Awesome Icons,BUNOOB
温馨提示:可以在图标代码后加一个空格再打网页名
2.5.2方法二
由于 Font Awesome 4.7.0 的内容有限,可以配合其新版 Font Awesome 6.21 一同使用(新版部分内容收费)。
下载并启用插件 Font Awesome

复制图标 HTML 代码
同方法一添加到文字前面即可
2.5.3编辑图标
在代码图标名字后面添加相应代码,比如:
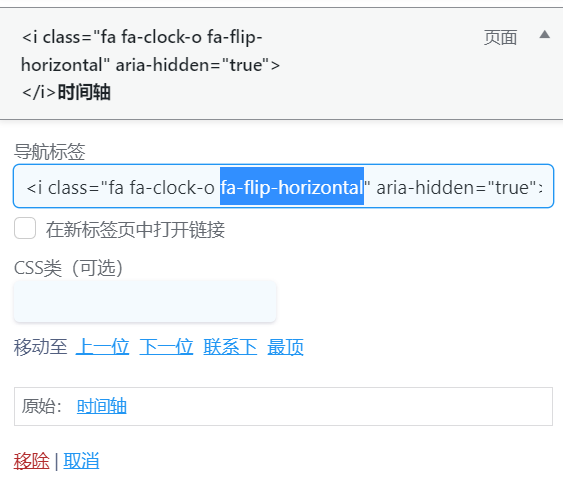
这里列举几个常用的,更多详情可以查看官方文档,写的很详细
//旋转
fa-rotate-90
//水平翻转
fa-flip-horizontal
//垂直翻转
fa-flip-vertical
//放大
fa-2x
2.5.4鼠标指针设置
在 外观–自定义–额外css 添加如下代码,鼠标样式图标可以去致美化下载https://zhutix.com/animated/page/4/
/* 鼠标指针样式 */
body {
cursor: url(https://dl.zhutix.net/2023/03/55488.png), default;
}
2.6文字颤抖特效
大致的原理是定义一个.my-face class,然后直接在html中调用类的函数。
首先,在外观–>主题文件编辑器–>主题页脚(footer.php文件)–>在末尾</body>上方( 或Argon主题选项–脚本–页脚脚本),加入如下代码:
<!--文字抖动特效开始-->
<link href="https://cdn.jsdelivr.net/gh/huangwb8/bloghelper@latest/css/myface.css" rel="stylesheet">
<!--文字抖动特效结束-->
然后,在外观–>主题文件编辑器–>主题页脚(footer.php文件)–>在</footer>之前(或Argon主题选项–页脚内容),添加以下代码:
<div class=""><span class="my-face">Copyright ©2022 版权所有 Daling</span></div>
2.7评论头像显示
在外观–>主题文件编辑器–>模板函数(functions.php文件),在末尾加入如下代码:
/*评论头像显示 CSS*/
if ( ! function_exists( 'get_cravatar_url' ) ) {
    /**
    *  把Gravatar头像服务替换为Cravatar
    * @param string $url
    * @return string
    */
    function get_cravatar_url( $url ) {
        $sources = array(
            'www.gravatar.com',
            '0.gravatar.com',
            '1.gravatar.com',
            '2.gravatar.com',
            'secure.gravatar.com',
            'cn.gravatar.com'
        );
        return str_replace( $sources, 'cravatar.cn', $url );
    }
    add_filter( 'um_user_avatar_url_filter', 'get_cravatar_url', 1 );
    add_filter( 'bp_gravatar_url', 'get_cravatar_url', 1 );
    add_filter( 'get_avatar_url', 'get_cravatar_url', 1 );
}
2.8年度倒计时显示
插入简码
在左 / 右侧栏或站点概览额外内容中插入简码(Argon 主题中有作者头像那侧,一般为左侧栏,无法进行编辑,可通过站点概览额外内容进行添加
添加代码
<div class="progress-wrapper" style="padding: 0">
	<div class="progress-info">
		<div class="progress-label">
		<span id="yearprogress_yearname"></span>
		</div>
		<div id="yearprogress_text_container" class="progress-percentage">
		<span id="yearprogress_progresstext"></span>
		<span id="yearprogress_progresstext_full"></span>
		</div>
	</div>

	<div class="progress">
		<div id="yearprogress_progressbar" class="progress-bar bg-primary"></div>
	</div>
</div>

<script no-pjax="">
	function yearprogress_refresh() {
	let year = new Date().getFullYear();
	$("#yearprogress_yearname").text(year);
	let from = new Date(year, 0, 1, 0, 0, 0);
	let to = new Date(year, 11, 31, 23, 59, 59);
	let now = new Date();
	let progress = (((now - from) / (to - from + 1)) * 100).toFixed(7);
	let progressshort = (((now - from) / (to - from + 1)) * 100).toFixed(2);
	$("#yearprogress_progresstext").text(progressshort + "%");
	$("#yearprogress_progresstext_full").text(progress + "%");
	$("#yearprogress_progressbar").css("width", progress + "%");
	}
	yearprogress_refresh();
	if (typeof yearProgressIntervalHasSet == "undefined") {
		var yearProgressIntervalHasSet = true;
		setInterval(function () {
		yearprogress_refresh();
		}, 500);
	}
</script>

<style>
#yearprogress_text_container {
	width: 100%;
	height: 22px;
	overflow: hidden;
	user-select: none;
}
#yearprogress_text_container > span {
	transition: all 0.3s ease;
	display: block;
}
#yearprogress_text_container:hover > span {
	transform: translateY(-20px);
}
</style>
2.9鼠标文字特效
在外观–>主题文件编辑器–>主题页脚(footer.php文件)–>在末尾</body>上方( 或Argon主题选项–脚本–页脚脚本),添加以下代码
a变量中的文字可自定义喜欢的文字。
<!--鼠标文字特效开始-->
<script type="text/javascript">
	var a_idx = 0;
	jQuery(document).ready(function($) {
		$("body").click(function(e) {
			// var a = new Array("❤富强❤","❤民主❤","❤文明❤","❤和谐❤","❤自由❤","❤平等❤","❤公正❤","❤法治❤","❤爱国❤","❤敬业❤","❤诚信❤","❤友善❤");
			var a = new Array("❤身体健康❤", "❤万事如意❤", "❤心想事成❤", "❤笑口常开❤", "❤年年有余❤", "❤金榜题名❤", "❤前程似锦❤", "❤一帆风顺❤");

			var $i = $("<span></span>").text(a[a_idx]);
			a_idx = (a_idx + 1) % a.length;
			var x = e.pageX,
			y = e.pageY;

			$i.css({
				"z-index": 99999,
				"top": y - 20,
				"left": x,
				"position": "absolute",
				"font-weight": "bold",
				"color": "rgb("+~~(255*Math.random())+","+~~(255*Math.random())+","+~~(255*Math.random())+")"//颜色随机
				//"#2299DD" //固定颜色
			});

			$("body").append($i);
			$i.animate({
				"top": y - 180,
				"opacity": 0
            },1500,function() {$i.remove();});
		});
	});
</script>
<!--鼠标文字特效结束-->
鼠标点击特效:
放在Argon主题选项–脚本-页头脚本里。
<html>
<body>
<script>
function clickEffect() {
	let balls = [];
	let longPressed = false;
	let longPress;
	let multiplier = 0;
	let width, height;
	let origin;
	let normal;
	let ctx;
	const colours = ["#F73859", "#14FFEC", "#00E0FF", "#FF99FE", "#FAF15D"];
	const canvas = document.createElement("canvas");
	document.body.appendChild(canvas);
	canvas.setAttribute("style", "width: 100%; height: 100%; top: 0; left: 0; z-index: 99999; position: fixed; pointer-events: none;");
	const pointer = document.createElement("span");
	pointer.classList.add("pointer");
	document.body.appendChild(pointer);

	if (canvas.getContext && window.addEventListener) {
		ctx = canvas.getContext("2d");
		updateSize();
		window.addEventListener('resize', updateSize, false);
		loop();
		window.addEventListener("mousedown", function(e) {
			pushBalls(randBetween(10, 20), e.clientX, e.clientY);
			document.body.classList.add("is-pressed");
			longPress = setTimeout(function(){
				document.body.classList.add("is-longpress");
				longPressed = true;
			}, 500);
		}, false);
		window.addEventListener("mouseup", function(e) {
			clearInterval(longPress);
			if (longPressed == true) {
				document.body.classList.remove("is-longpress");
				pushBalls(randBetween(50 + Math.ceil(multiplier), 100 + Math.ceil(multiplier)), e.clientX, e.clientY);
				longPressed = false;
			}
			document.body.classList.remove("is-pressed");
		}, false);
		window.addEventListener("mousemove", function(e) {
			let x = e.clientX;
			let y = e.clientY;
			pointer.style.top = y + "px";
			pointer.style.left = x + "px";
		}, false);
	} else {
		console.log("canvas or addEventListener is unsupported!");
	}

	function updateSize() {
		canvas.width = window.innerWidth * 2;
		canvas.height = window.innerHeight * 2;
		canvas.style.width = window.innerWidth + 'px';
		canvas.style.height = window.innerHeight + 'px';
		ctx.scale(2, 2);
		width = (canvas.width = window.innerWidth);
		height = (canvas.height = window.innerHeight);
		origin = {
			x: width / 2,
			y: height / 2
		};
		normal = {
			x: width / 2,
			y: height / 2
		};
	}

	class Ball {
		constructor(x = origin.x, y = origin.y) {
			this.x = x;
			this.y = y;
			this.angle = Math.PI * 2 * Math.random();
			if (longPressed == true) {
				this.multiplier = randBetween(14 + multiplier, 15 + multiplier);
			} else {
				this.multiplier = randBetween(6, 12);
			}
			this.vx = (this.multiplier + Math.random() * 0.5) * Math.cos(this.angle);
			this.vy = (this.multiplier + Math.random() * 0.5) * Math.sin(this.angle);
			this.r = randBetween(8, 12) + 3 * Math.random();
			this.color = colours[Math.floor(Math.random() * colours.length)];
		}
		update() {
			this.x += this.vx - normal.x;
			this.y += this.vy - normal.y;
			normal.x = -2 / window.innerWidth * Math.sin(this.angle);
			normal.y = -2 / window.innerHeight * Math.cos(this.angle);
			this.r -= 0.3;
			this.vx *= 0.9;
			this.vy *= 0.9;
		}
	}

	function pushBalls(count = 1, x = origin.x, y = origin.y) {
		for (let i = 0; i < count; i++) {
			balls.push(new Ball(x, y));
		}
	}

	function randBetween(min, max) {
		return Math.floor(Math.random() * max) + min;
	}

	function loop() {
		ctx.fillStyle = "rgba(255, 255, 255, 0)";
		ctx.clearRect(0, 0, canvas.width, canvas.height);
		for (let i = 0; i < balls.length; i++) {
			let b = balls[i];
			if (b.r < 0) continue;
				ctx.fillStyle = b.color;
				ctx.beginPath();
				ctx.arc(b.x, b.y, b.r, 0, Math.PI * 2, false);
				ctx.fill();
				b.update();
		}
		if (longPressed == true) {
			multiplier += 0.2;
		} else if (!longPressed && multiplier >= 0) {
			multiplier -= 0.4;
		}
		removeBall();
		requestAnimationFrame(loop);
	}

	function removeBall() {
		for (let i = 0; i < balls.length; i++) {
			let b = balls[i];
			if (b.x + b.r < 0 || b.x - b.r > width || b.y + b.r < 0 || b.y - b.r > height || b.r < 0) {
				balls.splice(i, 1);
			}
		}
	}
}
clickEffect();//调用特效函数
</script>
</body>
</html>
2.10自定义右击页面
放在 Argon主题选项–脚本–页头脚本 ,记得修改链接url
 <!-- 自定义右键内容开始 -->
<style type="text/css">
	a {text-decoration: none;}
	div.usercm{background-repeat:no-repeat;background-position:center center;background-size:cover;background-color:#fff;font-size:13px!important;width:130px;-moz-box-shadow:1px 1px 3px rgba
(0,0,0,.3);box-shadow:0px 0px 15px #333;position:absolute;display:none;z-index:10000;opacity:0.9;border-radius: 5px;}
	div.usercm ul{list-style-type:none;list-style-position:outside;margin:0px;padding:0px;display:block}
	div.usercm ul li{margin:0px;padding:0px;line-height:35px;}
	div.usercm ul li a{color:#666;padding:0 15px;display:block}
	div.usercm ul li a:hover{color:#fff;background:rgba(9,145,113,0.88);border-radius: 5px}
	div.usercm ul li a i{margin-right:10px}
	a.disabled{color:#c8c8c8!important;cursor:not-allowed}
	a.disabled:hover{background-color:rgba(255,11,11,0)!important}
	div.usercm{background:#fff !important;}
</style>

<div class="usercm" style="left: 199px; top: 5px; display: none;">
<ul>
	<li><a href="https://idaling.cn/"><i class="fa fa-home fa-fw"></i><span>首页</span></a></li>
	<li><a href="javascript:void(0);" onclick="getSelect();"><i class="fa fa-file fa-fw"></i><span>复制</span></a></li>
	<li><a href="javascript:void(0);" onclick="baiduSearch();"><i class="fa fa-search fa-fw"></i><span>Bing一下</span></a></li>
	<li><a href="javascript:history.go(1);"><i class="fa fa-arrow-right fa-fw"></i><span>前进</span></a></li>
	<li><a href="javascript:history.go(-1);"><i class="fa fa-arrow-left fa-fw"></i><span>后退</span></a></li>
	<li style="border-bottom:1px solid gray"><a href="javascript:window.location.reload();"><i class="fa fa-refresh fa-fw"></i><span>刷新</span></a></li>
	<li><a href="https://idaling.cn/link/"><i class="fa fa-user fa-fw"></i><span>和我当邻居</span></a></li>
	<li><a href="https://idaling.cn/liuyanban/"><i class="fa fa-pencil fa-fw"></i><span>给我留言吧</span></a></li>
</ul>
</div>

<script type="text/javascript" src="https://cdn.staticfile.org/layer/3.1.1/layer.js"></script>
<script type="text/javascript">
	(function(a) {
		a.extend({
			mouseMoveShow: function(b) {
				var d = 0,
				c = 0,
				h = 0,
				k = 0,
				e = 0,
				f = 0;
				a(window).mousemove(function(g) {
					d = a(window).width();
					c = a(window).height();
					h = g.clientX;
					k = g.clientY;
					e = g.pageX;
					f = g.pageY;
					h + a(b).width() >= d && (e = e - a(b).width() - 5);
					k + a(b).height() >= c && (f = f - a(b).height() - 5);
					a("html").on({
						contextmenu: function(c) {
							3 == c.which && a(b).css({
								left: e,
								top: f
							}).show()
                        },
						click: function() {
							a(b).hide()
						}
					})
				})
			},
			disabledContextMenu: function() {
				window.oncontextmenu = function() {
					return !1
				}
			}
		})
	})(jQuery);

	function getSelect() {
		"" == (window.getSelection ? window.getSelection() : document.selection.createRange().text) ? layer.msg("请选择需要复制的内容!") : document.execCommand("Copy")
	}

	function baiduSearch() {
		var a = window.getSelection ? window.getSelection() : document.selection.createRange().text;
        "" == a ? layer.msg("请选择需要Bing的内容!") : window.open("https://cn.bing.com/search?q=" + a)
	}

	$(function() {
		for (var a = navigator.userAgent, b = "Android;iPhone;SymbianOS;Windows Phone;iPad;iPod".split(";"), d = !0, c = 0; c < b.length; c++) if (0 < a.indexOf(b[c])) {
			d = !1;
		break
	}
	d && ($.mouseMoveShow(".usercm"), $.disabledContextMenu())
	});
</script>
 <!-- 自定义右键内容结束 -->
2.11音乐播放功能
在 Argon主题选项–脚本–页尾脚本 中,添加如代码
server="netease" 指定音乐平台为网易云,type="song" 指单曲类型,id="7373135320" 为音乐的 id(这里的id为打开音乐歌单,网址显示的id)
开启吸底模式 fixed="true", 开启迷你模式 mini="true", 随机播放 order="random", 关闭底部歌词 lrc-type="0"
注意:id需要为自己创建的歌单,不能为我喜欢的音乐;server可以改自己用的音乐平台,如netease(网易云)、tencent(QQ音乐)
具体参数设置点击此链接:https://yy.liveout.cn/article/Learn/front-end/aplayer%E5%8F%82%E6%95%B0.png
Aplayer播放器官网文档:APlayer HTML5音乐播放器 | ACE-BLOG (ace520.github.io)
<link rel="stylesheet" href="https://cdn.jsdelivr.net/npm/aplayer/dist/APlayer.min.css">
<script src="https://cdn.jsdelivr.net/npm/aplayer/dist/APlayer.min.js"></script>
<script src="https://cdn.jsdelivr.net/npm/meting@2.0.1/dist/Meting.min.js"></script>

<meting-js
	server="netease"
	type="playlist"
	id="7360465359"
	fixed="true"
	mini="true"
	order="random"
	loop="all"
	preload="auto"
	list-folded="false">
</meting-js>
2.12动态背景
在 Argon主题选项–脚本–页头脚本 中,背景可以通过更改 url 链接设置为自己的动态视频,尽量不要太大,否则别人访问时会刷新许久
<video
	src="https://new.gcxstudio.cn/wp-content/uploads/2022/03/daymode.mp4" /*白天动态视频链接*/
	class="bg-video bg-video-day"
	autoplay=""
	loop="loop"
	muted=""
></video>

<video
	src="https://new.gcxstudio.cn/wp-content/uploads/2022/03/darkmode.webm" /*夜间动态视频链接*/
	class="bg-video bg-video-night"
	autoplay=""
	loop="loop"
	muted=""
></video>

<style>
video.bg-video {
	position: fixed;
	z-index: -1;
	left: 0;
	right: 0;
	top: 0;
	bottom: 0;
	width: 100vw;
	height: 100vh;
	object-fit: cover;
	pointer-events: none;
}
html.darkmode video.bg-video.bg-video-day {
	opacity: 0;
}
html.darkmode video.bg-video.bg-video-night {
	opacity: 1;
}
video.bg-video.bg-video-day {
	opacity: 1;
}
video.bg-video.bg-video-night {
	opacity: 0;
}
#banner,
#banner .shape {
	background: transparent !important;
}
* {
	font-family: "Comfortaa", "Open Sans", -apple-system, system-ui,
	BlinkMacSystemFont, "Segoe UI", Roboto, "Helvetica Neue", Helvetica, Arial,
	"PingFang SC", "Hiragino Sans GB", "Microsoft YaHei", SimSun, sans-serif;
}
</style>

<script
	src="https://api.gcxstudio.cn/odometer/odometer.min.js"
	integrity="sha256-65R1G5irU1VT+k8L4coqgd3saSvO/Wufson/w+v2Idw="
	crossorigin="anonymous"
></script>

<link rel="stylesheet" href="https://cdn.jsdelivr.net/npm/aplayer/dist/APlayer.min.css">
<script src="https://cdn.jsdelivr.net/npm/aplayer/dist/APlayer.min.js"></script>

<div id='aplayer'></div>
2.13虚拟人物(看板娘)
方法一、如果只需要最基础的功能,那么只用将这一行代码加入 html 页面的 head 或 body 中,即可加载看板娘,添加代码的位置取决于你的网站的构建方式。
具体文章:stevenjoezhang/live2d-widget: 把萌萌哒的看板娘抱回家 (ノ≧∇≦)ノ | Live2D widget for web platform (github.com)
<script src="https://fastly.jsdelivr.net/gh/stevenjoezhang/live2d-widget@latest/autoload.js"></script>
方法二、在外观–>主题文件编辑器–>主题页脚(footer.php文件)–>在末尾</body>上方( 或Argon主题选项–脚本–页脚脚本),添加如下代码,其中 jsonpath: 后面的链接可按自己爱好更改,选择别的虚拟人物
<!--虚拟人物(看板娘)开始-->
<script src="https://eqcn.ajz.miesnfu.com/wp-content/plugins/wp-3d-pony/live2dw/lib/L2Dwidget.min.js"></script>
<script>
	L2Dwidget.init({
		"model": {
		//jsonpath控制显示那个小萝莉模型,
		//(切换模型需要改动)
//		"https://unpkg.com/(live2d-widget-model-koharu)@1.0.5/assets/(koharu).model.json"
			jsonPath: "https://unpkg.com/live2d-widget-model-koharu@1.0.5/assets/koharu.model.json",
			"scale": 1
		},
		"display": {
			"position": "right", //看板娘的表现位置
			"width": 75,  //小萝莉的宽度
			"height": 150, //小萝莉的高度
			"hOffset": 0,
			"vOffset": -20
		},
		"mobile": {
			"show": true,
			"scale": 0.5
		},
		"react": {
			"opacityDefault": 0.7,
			"opacityOnHover": 0.2
		}
	});
</script>

   /* 小帅哥: https://unpkg.com/live2d-widget-model-chitose@1.0.5/assets/chitose.model.json
      萌娘:https://unpkg.com/live2d-widget-model-shizuku@1.0.5/assets/shizuku.model.json
      白猫:https://unpkg.com/live2d-widget-model-tororo@1.0.5/assets/tororo.model.json
      黑猫: https://unpkg.com/live2d-widget-model-hijiki@1.0.5/assets/hijiki.model.json
      小可爱(女):https://unpkg.com/live2d-widget-model-koharu@1.0.5/assets/koharu.model.json
      小可爱(男):https://unpkg.com/live2d-widget-model-haruto@1.0.5/assets/haruto.model.json
      初音:https://unpkg.com/live2d-widget-model-miku@1.0.5/assets/miku.model.json
      圣职者妹妹:https://unpkg.com/live2d-widget-model-z16@1.0.5/assets/z16.model.json
      茶杯犬:https://cdn.jsdelivr.net/npm/live2d-widget-model-wanko@1.0.5/assets/wanko.model.json
      绿毛妹妹:https://unpkg.com/live2d-widget-model-tsumiki@1.0.5/assets/tsumiki.model.json
      金龟子妹妹:https://unpkg.com/live2d-widget-model-unitychan@1.0.5/assets/unitychan.model.json
      https://unpkg.com/live2d-widget-model-nito@1.0.5/assets/nito.model.json
      https://unpkg.com/live2d-widget-model-ni-j@1.0.5/assets/ni-j.model.json
      小阿狸: https://unpkg.com/live2d-widget-model-nico@1.0.5/assets/nico.model.json
      https://unpkg.com/live2d-widget-model-nietzche@1.0.5/assets/nietzche.model.json
      https://unpkg.com/live2d-widget-model-nipsilon@1.0.5/assets/nipsilon.model.json
      女学生: https://unpkg.com/live2d-widget-model-hibiki@1.0.5/assets/hibiki.model.json */
<!--虚拟人物(看板娘)结束-->
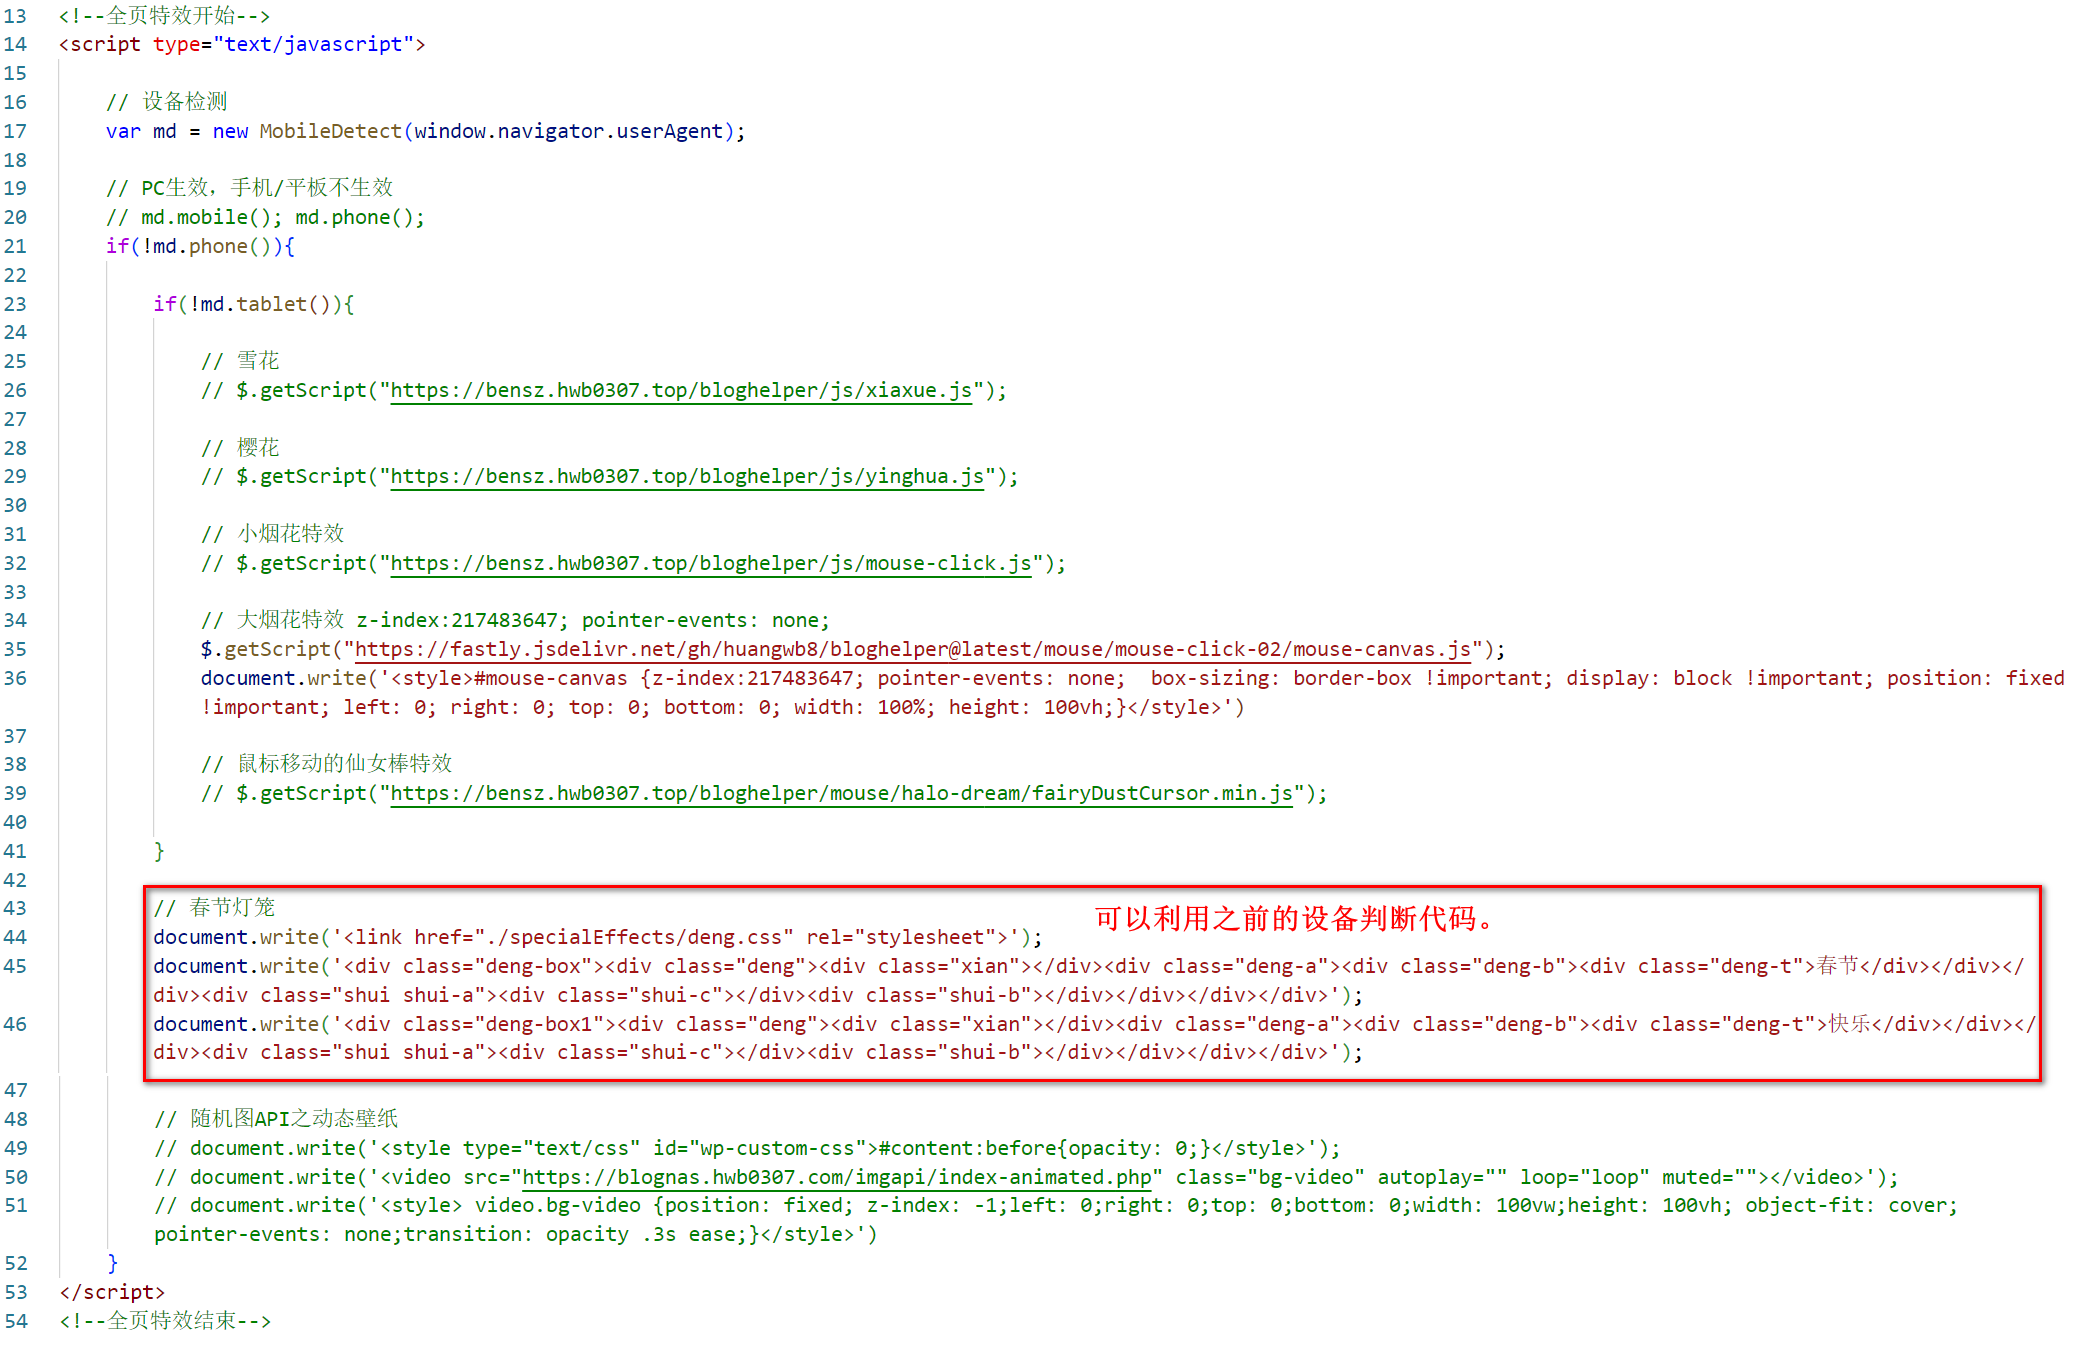
2.15雪花/樱花/烟花特效
2.15.1雪花/樱花/烟花特效
我这里提供的特效,在手机等设备是不生效的。因为手机的界面太小,特效会导致观看效果很差。设备判断主要利用mobile-detect项目提供的JS脚本(随机图API的php脚本也是类似的)。
在外观–>主题文件编辑器–>主题页脚(footer.php文件)–>在末尾</body>上方( 或Argon主题选项–脚本–页脚脚本)添加以下代码(放最后面可以最后加载特效,以免影响其他内容的访问速度),(要用某个特效,记得将代码前面的注释符//去除):
<!--全页特效开始-->
<script src="https://cdn.jsdelivr.net/gh/huangwb8/bloghelper@latest/js/mobile-detect.js"></script>
<script type="text/javascript">
    // 设备检测
    var md = new MobileDetect(window.navigator.userAgent);

    // PC生效,手机/平板不生效
    // md.mobile(); md.phone();
    if(!md.phone()){
        if(!md.tablet()){
            // 雪花
            $.getScript("https://cdn.jsdelivr.net/gh/huangwb8/bloghelper@latest/js/xiaxue.js");

            // 樱花
            // $.getScript("https://cdn.jsdelivr.net/gh/huangwb8/bloghelper@latest/js/yinghua.js");

            // 小烟花特效
            // $.getScript("https://cdn.jsdelivr.net/gh/huangwb8/bloghelper@latest/js/mouse-click.js");

            // 大烟花特效
            $.getScript("https://cdn.jsdelivr.net/gh/huangwb8/bloghelper@latest/mouse/mouse-click-02/mouse-canvas.js");
            document.write('<style>#mouse-canvas {z-index:217483647; pointer-events: none;  box-sizing: border-box !important; display: block !important; position: fixed !important; left: 0; right: 0; top: 0; bottom: 0; width: 100%; height: 100vh;}</style>')

            // 鼠标移动的仙女棒特效
            // $.getScript("https://bensz.onmicrosoft.cn/bloghelper/mouse/halo-dream/fairyDustCursor.min.js");

            // 鼠标移动的泡泡特效
            // $.getScript("https://bensz.onmicrosoft.cn/bloghelper/mouse/joe/censor10.js");
        }
    }
</script>
<!--全页特效结束-->
2.15.2雪花飘落特效
在外观–>主题文件编辑器–>主题页脚(footer.php文件)–>在末尾</body>上方( 或Argon主题选项–脚本–页脚脚本),添加如下代码:
<!--雪花飘落特效开始-->
<script type="text/javascript">
	(function($){
		$.fn.snow = function(options){
			var $flake = $('<div id="snowbox" />').css({'position': 'absolute','z-index':'9999', 'top': '-50px', 'cursor': 'pointer'}).html('❄'),
			documentHeight  = $(document).height(),
			documentWidth   = $(document).width(),
			defaults = {
				minSize: 10,
				maxSize: 20,
				newOn: 1000,
				flakeColor : "#AFDAEF" /* 此处可以定义雪花颜色,若要白色可以改为#FFFFFF */
			},
			options = $.extend({}, defaults, options);
			var interval= setInterval( function(){
				var startPositionLeft = Math.random() * documentWidth - 100,
				startOpacity = 0.5 + Math.random(),
				sizeFlake = options.minSize + Math.random() * options.maxSize,
				endPositionTop = documentHeight - 200,
				endPositionLeft = startPositionLeft - 500 + Math.random() * 500,
				durationFall = documentHeight * 10 + Math.random() * 5000;
				$flake.clone().appendTo('body').css({
					left: startPositionLeft,
					opacity: startOpacity,
					'font-size': sizeFlake,
					color: options.flakeColor
				}).animate({
					top: endPositionTop,
					left: endPositionLeft,
					opacity: 0.2
					},durationFall,'linear',function(){
						$(this).remove()
					});
				}, options.newOn);
			};
	})(jQuery);

	$(function(){
		$.fn.snow({
			minSize: 5, /* 定义雪花最小尺寸 */
			maxSize: 50,/* 定义雪花最大尺寸 */
			newOn: 300  /* 定义密集程度,数字越小越密集 */
		});
	});
</script>
<!--雪花飘落特效结束-->
2.16悼念色
在外观–自定义–额外CSS的最底部(否则容易和其它CSS代码冲突)添加下列代码即可:该CSS代码对于任何WordPress主题都是适用的。
/* 网站黑白色(悼念)*/
html {
    filter: grayscale(100%);
    -webkit-filter: grayscale(100%);
    -moz-filter: grayscale(100%);
    -ms-filter: grayscale(100%);
    -o-filter: grayscale(100%);
    filter: url("data:image/svg+xml;utf8,#grayscale");
    filter:progid:DXImageTransform.Microsoft.BasicImage(grayscale=1);
    -webkit-filter: grayscale(1);
}
2.17卡片3D特效
在外观–>主题文件编辑器–>主题页脚(footer.php文件)–>在末尾</body>上方( 或Argon主题选项–脚本–页脚脚本),添加如下代码:
基本原理大概是定义一个函数,它有多个参数可以调整某个对象的位置、角度等属性,然后通过JS调用。在Argon主题中,所有的卡片都来自.card类。所以,如果你使用VanillaTilt.init(document.querySelectorAll(".card"),那么所有的卡片都会动起来。不过,我只需要让文章卡片article.post:not(.post-full)和说说卡片.shuoshuo-preview-container动起来,所以仅定义了这两个对象的运作。
<!--鼠标悬停3D效果开始-->
	<!--1.定义对象属性(似乎没生效)-->
<div class="article.post:not(.post-full)" data-tilt></div>
<div class=".shuoshuo-preview-container" data-tilt></div>
	<!--2.JS脚本-->
	<!--script src="https://cdn.jsdelivr.net/gh/huangwb8/bloghelper@latest/js/mobile-detect.js"></script--> <!--如果你没有引用过mobile-detect.js,请去除这里的注释以使其生效-->
<script type="text/javascript" src="https://cdn.jsdelivr.net/gh/huangwb8/bloghelper@latest/vanilla3D/vanilla-tilt.js"></script>
	<!--3.动作-->
<script type="text/javascript">
    // 设备检测。依赖前述mobile-detect项目。
    var md = new MobileDetect(window.navigator.userAgent);

    // PC生效,手机/平板不生效
    // md.mobile(); md.phone();
    if(!md.phone() && !md.tablet()){
        window.pjaxLoaded = function(){
            // 正文卡片
            VanillaTilt.init(document.querySelectorAll("article.post:not(.post-full)"),{
                reverse:false,  // 是否反转倾斜方向
                max:2,     // 最大的倾斜角度(度)
                startX:0,      // X轴上的起始倾斜,单位为度。
                startY:0,      // Y轴上的起始倾斜,单位为度。
                perspective:1000,   // 转换角度,越低倾斜越极端
                scale:1.02,      // 缩放比例,2 = 200%, 1.5 = 150%, 等等..
                speed:300,    // 进入/退出 过渡的速度
                transition:true,   // 是否在进入/退出的时候设置过渡效果
                axis:"y",   // 设置禁用哪个轴的反转,值为"x"或者"y"或者null
                reset:true,   // 设置在退出时清除倾斜效果
                easing:"cubic-bezier(.03,.98,.52,.99)",    // 设置进入退出时过渡的贝塞尔曲线
                glare:true,// 设置是否拥有炫光效果,即透明度渐变效果
                "max-glare":0.7,      // 设置最大的透明效果,1=100%,0.5=50%
                "glare-prerender":false,  // false, VanillaTilt为你创建透明炫光元素,否则你需要自己在.jstilt-glare>.js-tilt-glare-inner中自己添加render函数
                "mouse-event-element":null,   // css选择器或者链接到HTML的元素,他将监听该元素上的鼠标事件
                "full-page-listening":false,  // 是否监听整个页面的鼠标移动事件,若为true,他将监听这个页面,而非选中元素
                gyroscope:false,   // 是否开启陀螺仪的方向检测
                gyroscopeMinAngleX: 0,  //陀螺仪最小角度X
                gyroscopeMaxAngleX: 0,  //陀螺仪最大角度X
                gyroscopeMinAngleY: 0,  //陀螺仪最小角度
                gyroscopeMaxAngleY: 0,  //陀螺仪最大角度
                gyroscopeSamples: 10  //陀螺仪样品
            })

            // 说说卡片
            VanillaTilt.init(document.querySelectorAll(".shuoshuo-preview-container"),{
                reverse:false,  // 是否反转倾斜方向
                max:2,     // 最大的倾斜角度(度)
                startX:0,      // X轴上的起始倾斜,单位为度。
                startY:0,      // Y轴上的起始倾斜,单位为度。
                perspective:1000,   // 转换角度,越低倾斜越极端
                scale:1.02,      // 缩放比例,2 = 200%, 1.5 = 150%, 等等..
                speed:300,    // 进入/退出 过渡的速度
                transition:true,   // 是否在进入/退出的时候设置过渡效果
                axis:"y",   // 设置禁用哪个轴的反转,值为"x"或者"y"或者null
                reset:true,   // 设置在退出时清除倾斜效果
                easing:"cubic-bezier(.03,.98,.52,.99)",    // 设置进入退出时过渡的贝塞尔曲线
                glare:true,// 设置是否拥有炫光效果,即透明度渐变效果
                "max-glare":0.7,      // 设置最大的透明效果,1=100%,0.5=50%
                "glare-prerender":false,  // false, VanillaTilt为你创建透明炫光元素,否则你需要自己在.jstilt-glare>.js-tilt-glare-inner中自己添加render函数
                "mouse-event-element":null,   // css选择器或者链接到HTML的元素,他将监听该元素上的鼠标事件
                "full-page-listening":false,  // 是否监听整个页面的鼠标移动事件,若为true,他将监听这个页面,而非选中元素
                gyroscope:false,   // 是否开启陀螺仪的方向检测
                gyroscopeMinAngleX: 0,  //陀螺仪最小角度X
                gyroscopeMaxAngleX: 0,  //陀螺仪最大角度X
                gyroscopeMinAngleY: 0,  //陀螺仪最小角度
                gyroscopeMaxAngleY: 0,  //陀螺仪最大角度
                gyroscopeSamples: 10  //陀螺仪样品
            })
        }
        $(window.pjaxLoaded);
        $(document).on('pjax:end', window.pjaxLoaded);
    }
</script>
<!--鼠标悬停3D效果结束-->
卡片3D效果的两个选择器可以合并起来写,用逗号分隔:document.querySelectorAll("article.post:not(.post-full), .shuoshuo-preview-container")。感兴趣的小伙伴自己试试看喽!
对于Argon主题的使用者,这样就可以了!在Argon主题中,window.pjaxLoaded函数内的命令会避免使用Pjax并在切换页面时强制刷新,这个必须要用才可以保证特效的完美运行。如果是其它主题的话,你改一下控制对象的名字即可,具体情况具体分析。
2.18鼠标指针特效
在外观–>主题文件编辑器–>主题页脚(footer.php文件)–>在末尾</body>上方( 或Argon主题选项–脚本–页脚脚本),添加如下代码:
2.18.1鼠标指针特效–影相随
<!--鼠标指针特效--影相随开始 -->
<!--鼠标样式:两个同心圆,大圆追小圆-->
<style type="text/css">
#cursor{position:fixed;width:16px;height:16px;background:#009688;border-radius:8px;opacity:0.25;z-index:10086;pointer-events:none;transition:0.2s ease-in-out;transition-property:background,opacity,transform}
#cursor.hidden{opacity:0}
#cursor.hover{opacity:0.1;transform:scale(2.5)}
#cursor.active{opacity:0.5;transform:scale(0.5)}
#clickME{cursor:pointer;display:inline-block;border:1px solid #009688}
</style>
<script src="https://cdn.jsdelivr.net/gh/huangwb8/bloghelper@latest/js/cursor_01.js"></script>
<!--鼠标指针特效--影相随结束-->
2.18.2鼠标指针特效–仙女棒
首先,在雪花/樱花/烟花特效里添加代码(保证只在PC端使用这个特效),它是仙女棒特效的来源,完全基于js生成,所以直接引用大佬们写好的脚本即可。将下列代码加到上面的雪花/樱花/烟花特效的JS框里:
// 鼠标移动的仙女棒特效。
$.getScript("https://cdn.jsdelivr.net/gh/huangwb8/bloghelper@latest/mouse/halo-dream/fairyDustCursor.min.js");
其次,鼠标外观样式在外观–主题文件编辑器–主题页脚(footer.php文件)文件里加入如下代码
<!--鼠标指针特效--仙女棒/吹泡泡开始-->
<style type="text/css">
.main-content img,body{cursor:url(https://cdn.jsdelivr.net/gh/huangwb8/bloghelper@latest/mouse/halo-dream/cursor/breeze/Arrow.cur),auto}.actions>div,.expand-done,.main-content figure>figcaption div,.navbar-above .navbar-nav .item,.navbar-searchicon,.navbar-slideicon,.photos .picture-details,.widget .ad-tag .click-close,a,button{cursor:url(https://cdn.jsdelivr.net/gh/huangwb8/bloghelper@latest/mouse/halo-dream/cursor/breeze/Hand.cur),auto}blockquote,code,h1,h2,h3,h4,h5,h6,hr,input[type=text],li,p,td,textarea,th{cursor:url(https://cdn.jsdelivr.net/gh/huangwb8/bloghelper@latest/mouse/halo-dream/cursor/breeze/IBeam.cur),auto}
</style>
<!--鼠标指针特效--仙女棒/吹泡泡结束-->
2.18.3鼠标指针特效–吹泡泡
用法同上:鼠标指针特效–仙女棒特效
首先,在雪花/樱花/烟花特效里添加代码(保证只在PC端使用这个特效),它是吹泡泡特效的来源,完全基于js生成,所以直接引用大佬们写好的脚本即可。将下列代码加到上面的雪花/樱花/烟花特效的JS框里:
$.getScript("https://cdn.jsdelivr.net/gh/huangwb8/bloghelper@latest/mouse/joe/censor10.js");
添加了一些代码对argon主题色进行自适应,添加到上述代码的JS框里
// 1. 获取argon的主题色
const themeColorRgbStr = getComputedStyle(document.documentElement).getPropertyValue('--themecolor-rgbstr');

// 2. 将其与 0.1 组合成一个 RGBA 颜色字符串
const rgbaColor = `rgba(${themeColorRgbStr}, 0.1)`;
const rgbaColor2 = `rgba(${themeColorRgbStr}, 0.9)`;
在后面的脚本中,有t.fillStyle=rgbaColor,t.strokeStyle=rgbaColor2。大家可以直接定义t.fillStyle(填充色)和t.strokeStyle(轮廓色),变量类型是类似#3a92c5的十六进制颜色码;从而可以将该特效移植到任何wordpress主题。
2.19文字输入撒花特效
在外观–>主题文件编辑器–>主题页脚(footer.php文件)–>在末尾</body>上方( 或Argon主题选项–脚本–页脚脚本),添加如下代码:
<!--文字输入撒花特效开始-->
<script src="https://cdn.jsdelivr.net/gh/huangwb8/bloghelper@latest/js/input-with-fire.js"></script>
<!--文字输入撒花特效结束-->
2.20网站标题可爱字体
在外观–>主题文件编辑器–>主题页脚(footer.php文件)–>在末尾</body>上方( 或Argon主题选项–脚本–页脚脚本),添加如下代码:
<!--网站标题可爱字符开始-->
<script>
$.getScript("https://cdn.jsdelivr.net/gh/huangwb8/bloghelper@latest/js/onfocus.js");
</script>
<!--网站标题可爱字符结束-->
2.21Argon主题点击概要也可以进入文章
在默认情况下,我们的文章只能通过点击标题进入。按这个设置后,你点击概要也可以进入文章!

这一串代码是:
onclick="window.location.href='<?php the_permalink(); ?>'" style="cursor: pointer"
值得注意的是,该代码将破坏Pjax的效果,我暂时还没有找到兼容的方法。因此,如果你的Argon主题开启了Pjax(无加载刷新),最好不要使用此代码,否则访客点击预览内容后会强制刷新网页。
2.22春节灯笼挂件
方法一:在外观–>主题文件编辑器–>主题页脚(footer.php文件)–>在末尾</body>上方( 或Argon主题选项–脚本–页脚脚本),添加如下代码:
<!--春节灯笼开始-->
<link href="https://cdn.jsdelivr.net/gh/huangwb8/bloghelper@latest/css/deng.css" rel="stylesheet">
<div class="deng-box">
<div class="deng">
<div class="xian"></div>
<div class="deng-a">
<div class="deng-b"><div class="deng-t">春节</div></div>
</div>
<div class="shui shui-a"><div class="shui-c"></div><div class="shui-b"></div></div>
</div>
</div>

<div class="deng-box1">
<div class="deng">
<div class="xian"></div>
<div class="deng-a">
<div class="deng-b"><div class="deng-t">快乐</div></div>
</div>
<div class="shui shui-a"><div class="shui-c"></div><div class="shui-b"></div></div>
</div>
</div>
<!--春节灯笼结束-->
方法二:为了利用js的设备判断,在js中加入代码:
// 春节灯笼
document.write('<link href="https://cdn.jsdelivr.net/gh/huangwb8/bloghelper@latest/css/deng.css" rel="stylesheet">');
document.write('<div class="deng-box"><div class="deng"><div class="xian"></div><div class="deng-a"><div class="deng-b"><div class="deng-t">春节</div></div></div><div class="shui shui-a"><div class="shui-c"></div><div class="shui-b"></div></div></div></div>');
document.write('<div class="deng-box1"><div class="deng"><div class="xian"></div><div class="deng-a"><div class="deng-b"><div class="deng-t">快乐</div></div></div><div class="shui shui-a"><div class="shui-c"></div><div class="shui-b"></div></div></div></div>');
如下图所示:
2.23小工具:时间进度条
大致原理是基于html/css/js定义一个时间进度条b。然后,将b插入到sidebar.php的id="leftbar_part2"前面,从而实现在左侧栏的目标位置(站点概览的窗口上方)植入b。
具体做法如下:
1、下载progress-wrapper.php文件。下载地址:Alist; Github。
2、将progress-wrapper.php保存在WordPress根目录下的某个位置。比如,我放的位置是./specialEffects/progress-wrapper.php。
3、在主题编辑器中找到sidebar.php文件。
4、在sidebar.php的<div id="leftbar_part2" class="widget widget_search card bg-white shadow-sm border-0">标签前引用命令:<?php require('./specialEffects/progress-wrapper.php'); ?>,如图所示:

其中,./specialEffects/progress-wrapper.php是我实际使用的路径,请根据实际情况修改。
此外,progress-wrapper.php中有一些重要的参数,可根据实际情况自定义。详见下图:
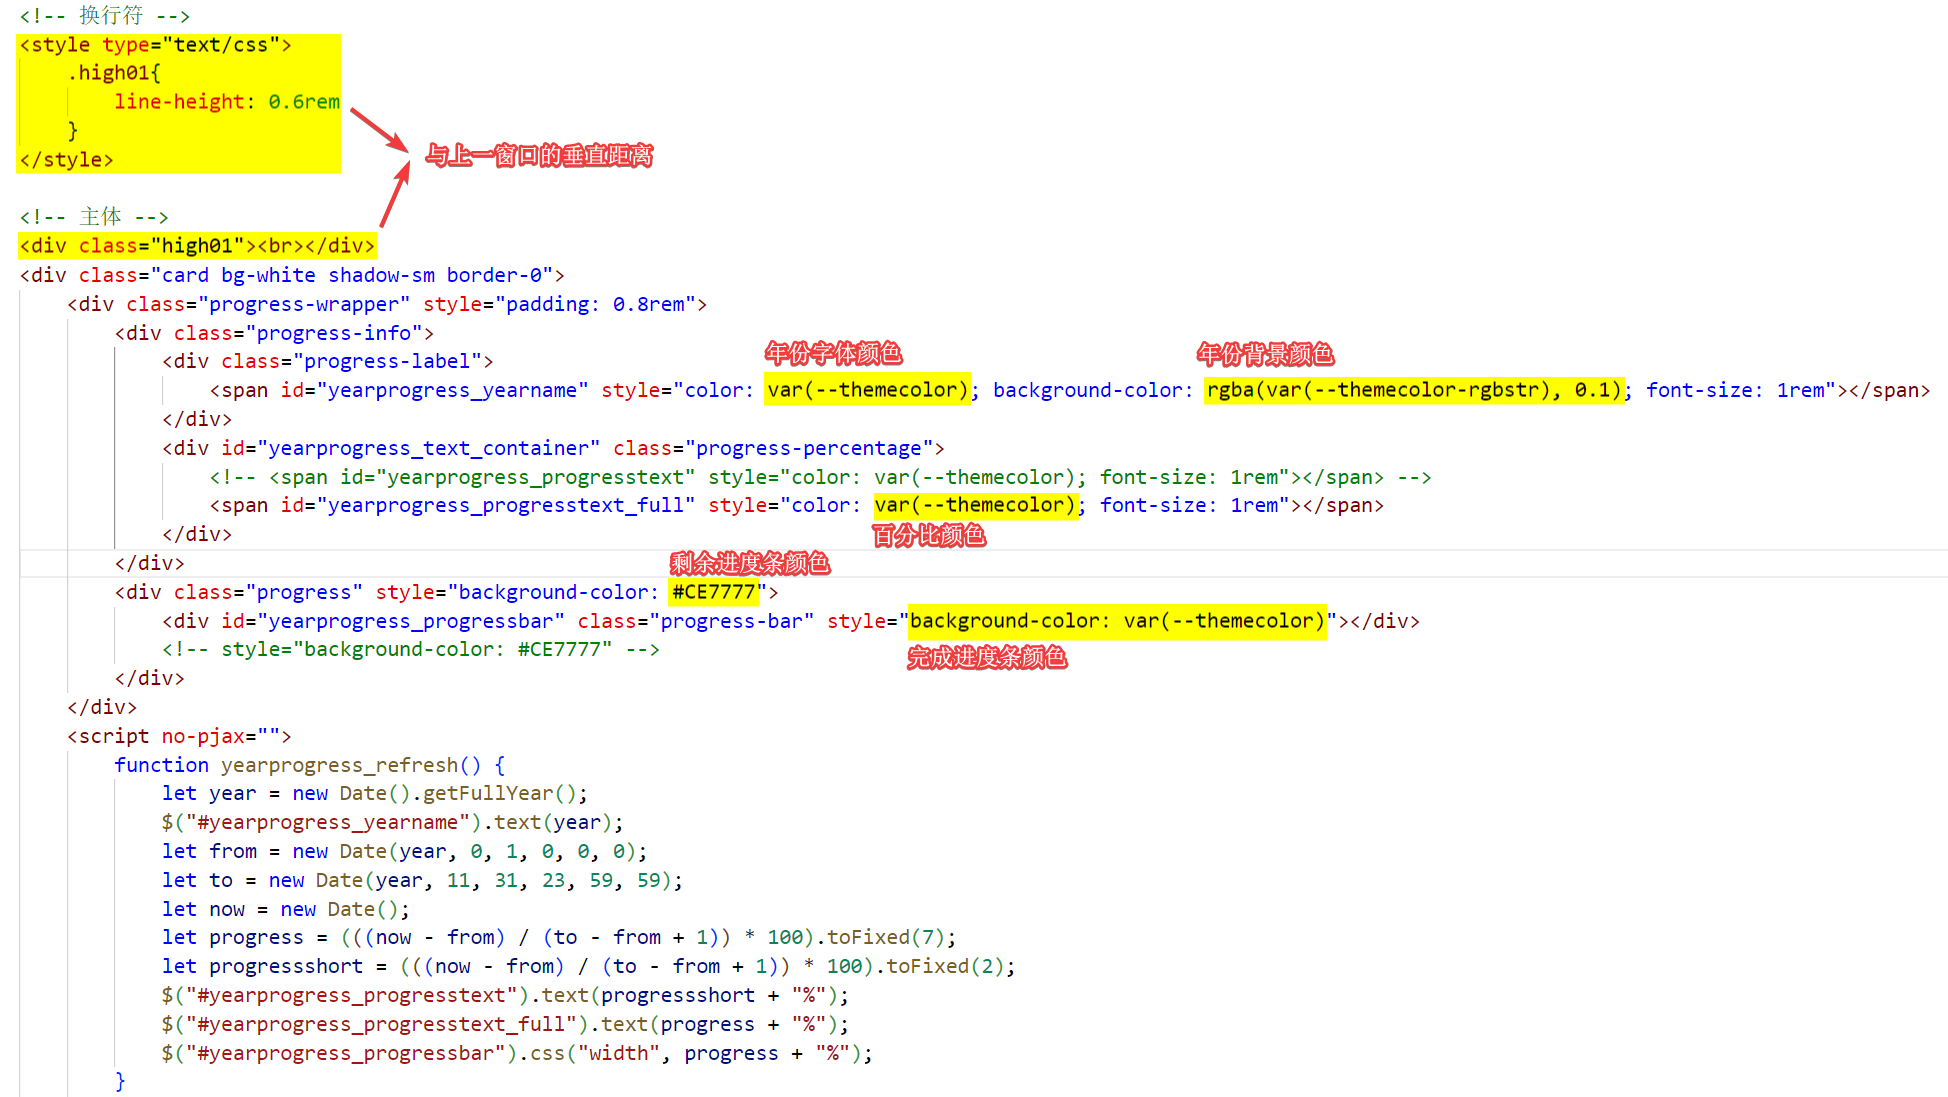
百分比有2种模式,一种是yearprogress_progresstext,另一种是yearprogress_progresstext_full。full会返回一个更加精确的数字:
2.24小工具:时间进度条-去重叠
如果仅按上面的方法设置,存在卡片重叠现象:
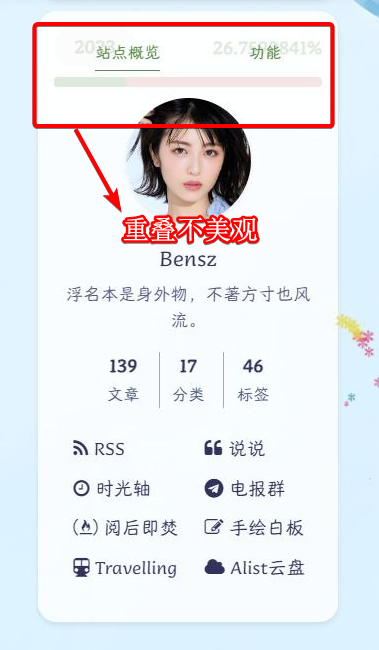
据测试,argon主题判断向上隐藏某卡片时依据其ID标签是否为left_part1。因此,基本的思路是给时间进度条添加该标签,然后将旧标签删除(原来是属于搜索框的)。修复方法如下:
1、给时间进度条添加leftbar_part1的标签:

2、将sidebar.php中原来的left_part1对应的ID标签删除:
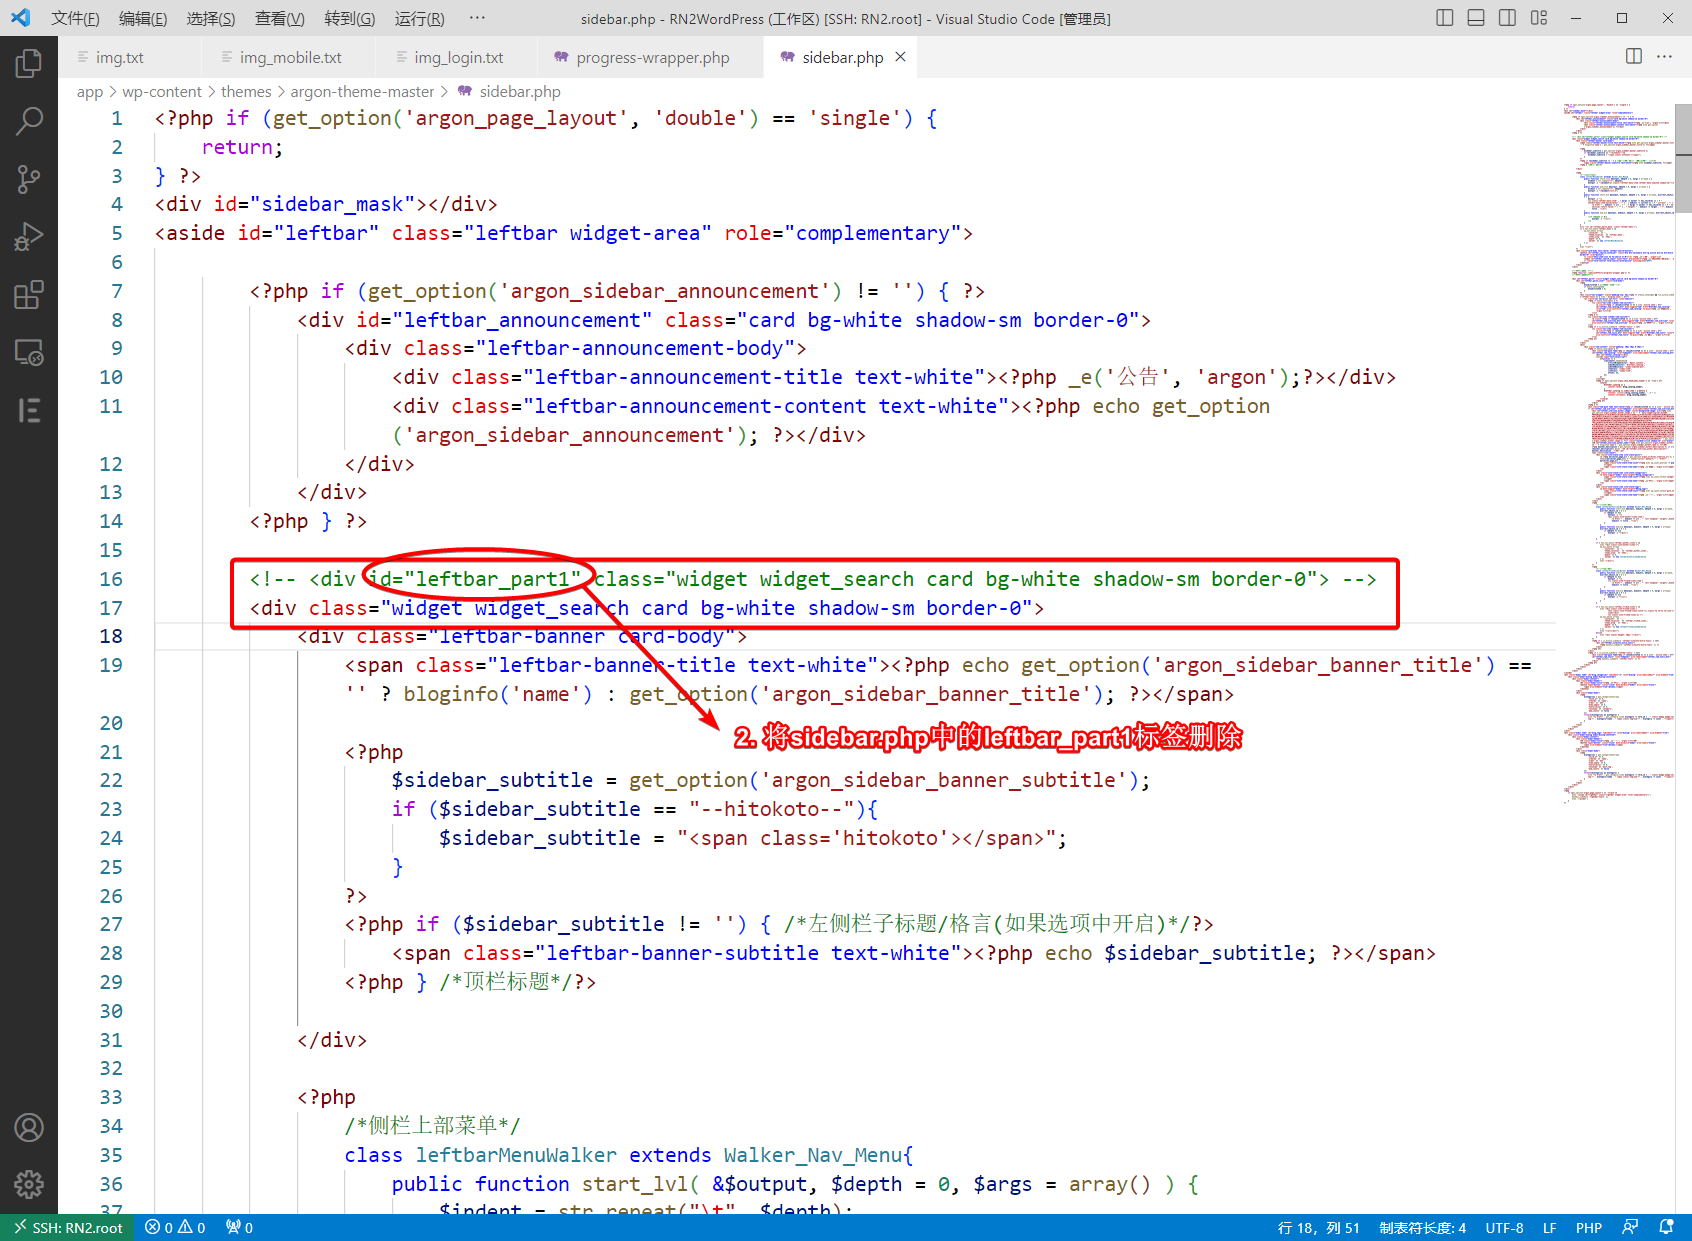
修改并保存后即时生效。不过,后面我发现这种设置会导致移动端的菜单栏不能自动隐藏,所以暂时也没有使用。以后有机会研究下!
3.Argon主题设置
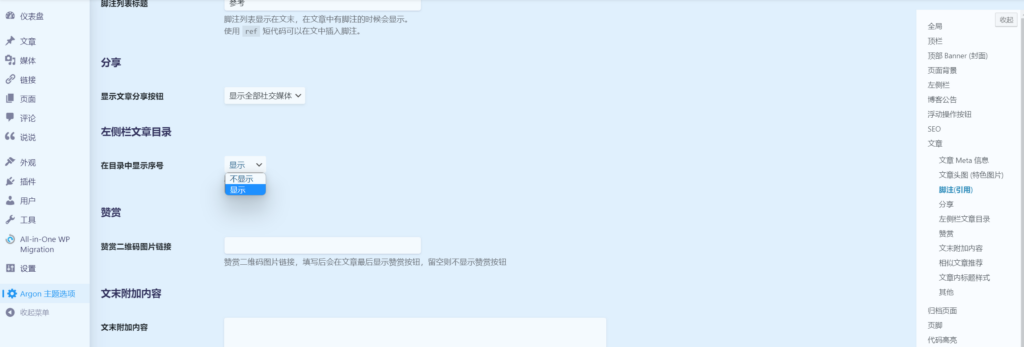
3.1左侧文章目录添加序号
Argon提供了设置:Argon主题选项–文章–左侧栏文章目录–在目录中显示序号–显示
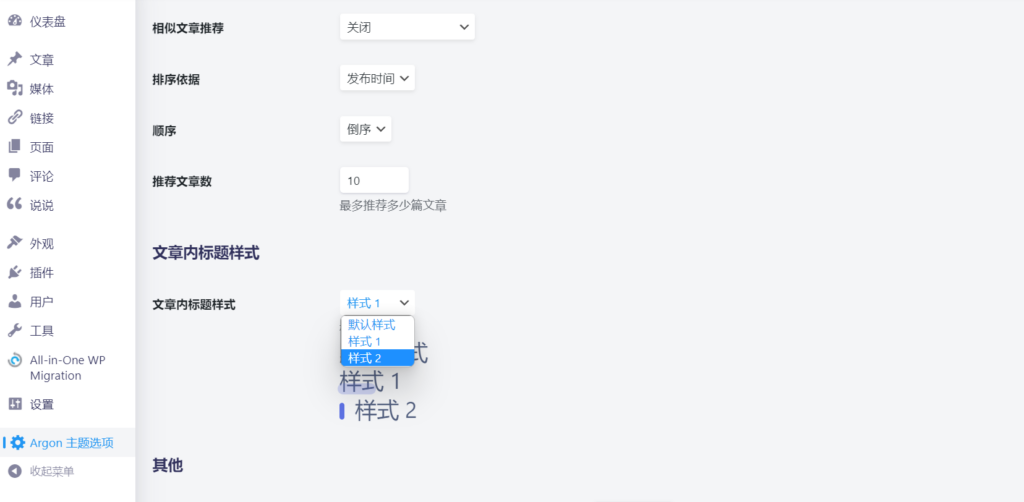
3.2标题前添加小竖线
Argon提供了设置:Argon主题选项–文章–文章内标题样式–样式2
4.代码来源
Argon主题博客美化 – Echo小窝 (liveout.cn)
Argon主题美化 – 北冥红烧鱼的芥子空间 (hongshaoyv.com)
Docker系列 WordPress系列 特效 – Bensz (hwb0307.com)
wordpress博客Argon主题美化_周杰伦的稻香的博客-CSDN博客
